Heart Hair Clip

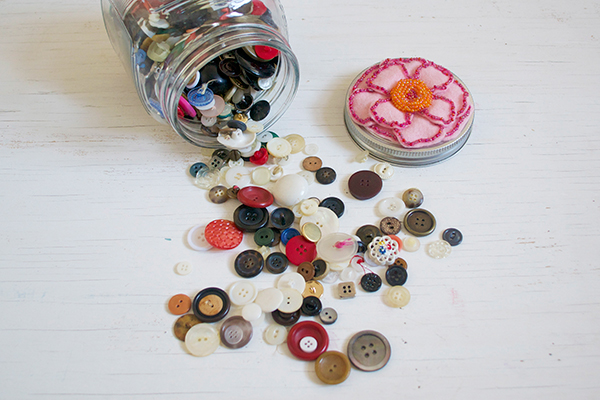
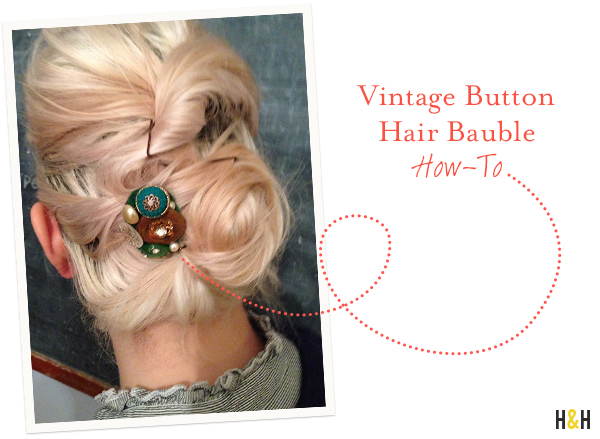
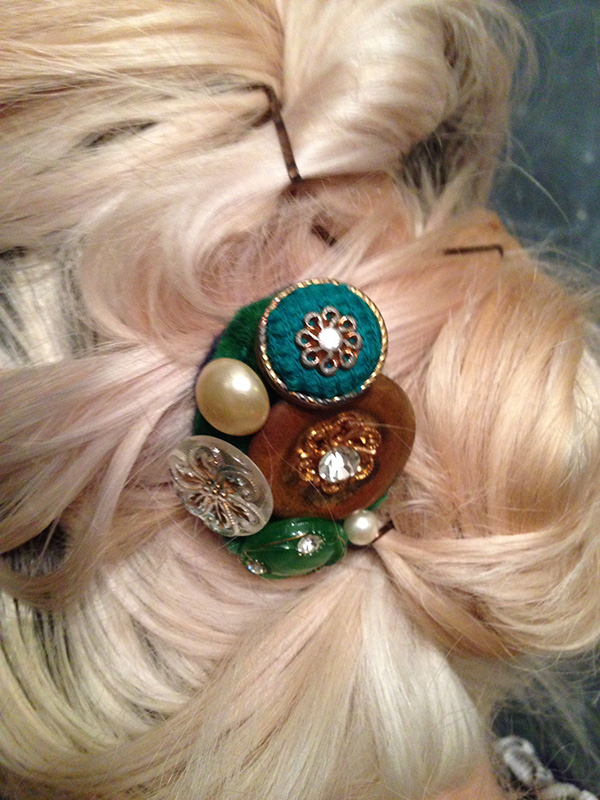
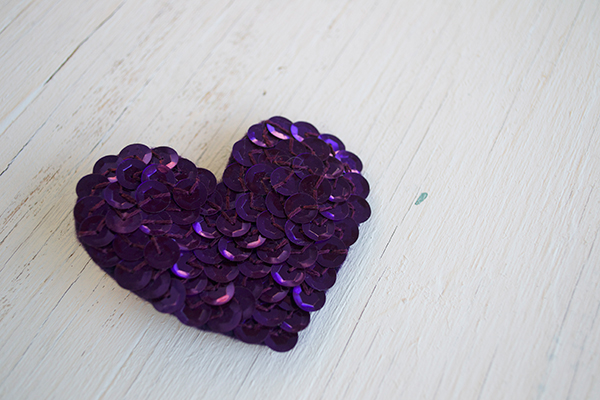
As you know, I’ve been on a bit of a hair accessory kick lately. I love the sparkly baubles to put in my hair, but I really hate paying much for them. A few weeks ago, I showed you this Vintage Button Hair Bauble I made from some of Nana’s button collection. Today, I thought I’d show you how I made this sequined heart.

Heart Hair Bling | Hannah & Husband

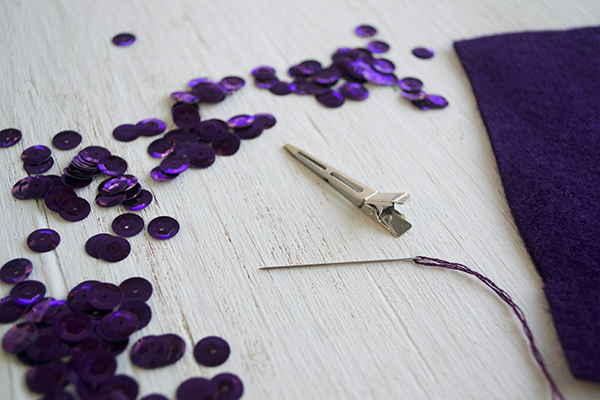
For this, I just layered sequins onto a piece of wool felt one night while watching Pitch Perfect. (Seriously, how much do you adore that movie?)

Tip: Use real wool felt. It’s heftier than the cheaper synthetic stuff and will keep its shape.

Heart Hair Bling | Hannah & Husband

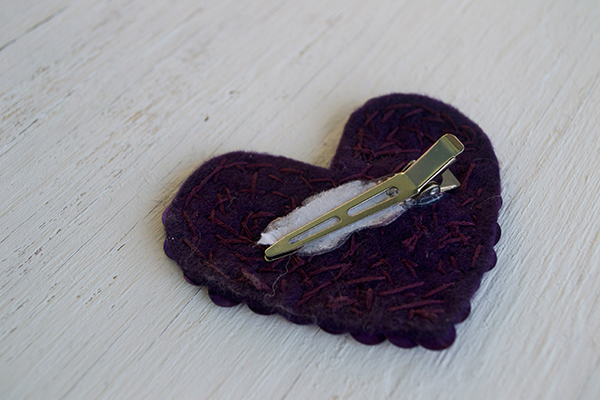
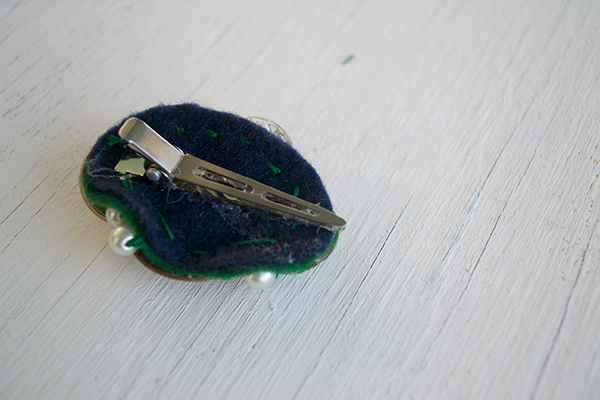
As you can see, this time I used a piece of paper to try to prop the clip open against the hot glue. While it did the trick or helping me not glue the clip shut, it left behind some paper. So not only does it look terrible; it also makes the piece harder to take in and out.

After experimenting a bit more, I’d just recommend holding the clip open. The glue doesn’t take very long to dry.

Heart Hair Bling | Hannah & Husband

After the last hair post, I got several questions (on the post and via social media) about how I do my hair. I’ll post a video of that soon!

Vintage Button Hair Bauble

Vintage Button Hair Bobble How-To | Hannah & Husband

When I was little, I would spend afternoons sorting through my mom’s old button collection while she sewed. So when I inherited Husband’s beautiful Nana’s vintage collection, it was like getting a jar full of gold! Since then, I’ve been trying to figure out ways to incorporate these little treasures into my everyday style. My latest idea: hair baubles! Here’s how you can make your own.

button-hair-bauble

Vintage Button Hair Bobble How-To | Hannah & Husband

First things first: Gather your materials.

  • 2 identically cut pieces of felt
  • a hair clip (you can get these from any craft store or beauty supply)
  • needle
  • thread
  • vintage buttons
  • a glue gun

Vintage Button Hair Bobble How-To | Hannah & Husband

I started by sewing buttons onto the green piece of felt that I didn’t mind showing up a little behind them. Start with the biggest ones and then fill in with smaller buttons, beads, and pearls.

Vintage Button Hair Bobble How-To | Hannah & Husband

Vintage Button Hair Bobble How-To | Hannah & HusbandNext I sewed the navy piece of felt onto the back to keep all those knots from showing.

I could have sewed the hair clip on the navy piece before doing sewing the two together, but I chose to just hot glue it on. In retrospect, sewing probably would’ve made for a prettier back.

Voilà!


Bangle Holder DIY

Bangle Holder DIY | Hannah & Husband

This bangle holder was a super easy DIY that totally brightened up my vanity so I thought I would share it with you! I’ve always loved the silhouette of beautiful candlestick holders. See exhibits a, b, & c.

And I also happen to enjoy stalking the $1 aisle at Target. So when I scored these little ceramic candle holders, I couldn’t resist. So here we go: a super cute $2 bangle holder.

Bangle Holder DIY | Hannah & Husband

I used a little super glue to join them together. (Added masking tape to hold them in place while the glue set–super scientific as always.)

Bangle Holder DIY | Hannah & Husband

Then, I had Husband cut me a small square  for a base. Add a little paint, fill it up with bangles, and voila!

Bangle Holder DIY | Hannah & Husband


Make My New Necklace Hanger

necklace-hanger

A couple weeks ago, Husband redid my closet (because he’s the best), and I decided that if my clothes were getting a stylish new home, my jewelry should too. So I went to Lowe’s–not quite sure what I was looking for. I ended up finding these beautiful pre-cut corbels in the aisle with the banisters and trim so I nabbed ’em!

Here are the other supplies:

  • a bit of paint & a brush
  • drill
  • screw hooks
  • set of picture hangers
  • hammer

01-necklace-supplies

I also got a sample of Pantone paint and applied two coats.

02-necklace-paint

Next, I drilled holes for the hooks.

Note: Be sure that your drill bit is set short enough that it won’t go all the way through the wood. Husband helped me with this part, and I was pretty excited to conquer some serious fear of the drill.

03-necklace-drill

Next, grab the hammer. Before you attach the picture hangers to the back, be sure you’re working on a soft surface. You don’t want to scratch up your paint job.

04-necklace-hanger

Then, just screw in your screw hooks, and hang it up.

05-necklace-hooks

If you have an old house like we do, you live in constant fear of the plaster cracking.

Here’s a little tip (again thanks to Husband): Place a piece of painter’s tape over on the spot before you start hammering in your nail. Then, just pull it off before you hang things up.

06-necklace-tip

Now there’s nothing left to do but hang up your necklaces.

07-necklace-hang


Making My Own Stationery

make your own stationery, supplies

As I’ve said before, I really love mail. Sending mail. Getting mail. I love it all. So a few weeks ago, when I ran out of stationery, I decided to make something a little more personal than just buying it at a shop like I usually do. Here’s what I did.

First, I went to the craft store and bought 2 sets of blank stationery–one craft and one white. They come in large packs so there will be plenty to experiment with. Next, I took apart one of the envelopes, and used the inside to make a template from cardboard with my ruler and an X-acto. Use the one solid side (where the address goes) and cut just under the glue of the flap.

Next, I traced the template on the random scrap papers I’d collected and cut it out with scissors.

make your own stationery, envelope liner

make your own stationery, envelope liner step 2

After placing the new liner inside the envelope and straightening it, I gently folded the flap down. Finally, I used a glue stick to attach the new liner to the inside of the top. You don’t have to worry about gluing the bottom half because it will stay in place by itself.

make your own stationery

Finally, after lining all of the envelopes, I decorated the cards with stamps and scraps.

make your own stationery

And voila! My new stationery…

make your own stationery

Now, to the writing…

Learn Something New

Home again. Home again. Jiggity jig. The trip to Maker Faire was wonderful, and I’ll be sharing a lot of it in the next week or two once we wrap our heads around the plethora of content we came home with.

In the meantime, I thought I’d share some cool resources that I’ve found online lately that have me pretty excited. Every once in a while, I feel like my brain gets a little stale. Does that ever happen to you? You finish a big project, you are running from appointment to appointment trying to check things off your ToDo list… oh, that ToDo list… So rather than complacently ignore the feeling, I thought, “I need a challenge!”

So I thought back to the times when I have felt most creative. One of those, not surprisingly, was during school. When you’re in school, there’s a goal. There’s a definite end to projects. Best of all, you are surrounded by people with a passion for the same sorts of things that interest you. As a result, there’s an excitement about learning something new, and excitement always makes it easier to get out of your box.

Home Ec students

But when you get older, finding a learning community can be a little more difficult. Needless to say, I was super stoked to find several online resources where you can take classes that are free (or close to it) to challenge yourself and learn something new. Here are a few that have caught my eye that may interest you too…

SKILLSHARE
Illustration & Lettering: A Hands-on Approach to Label Design
taught by Jon Contino

STANFORD ONLINE
Online courses that free, taught by Stanford’s own faculty and taken by people all over the world.

CREATIVEBUG
I heard about this site on Jordan Ferney’s blog. These classes are more craft/skill-geared, and teach skills that can really help you create your own world.

So now I’m curious…
Have you ever taken an online course just for fun?

The Latest Big Project or… Why I Really Like My Job

Over the past year, I’ve gotten to be a part of 3 specific projects at work that made me go, “Really? You’re going to pay me to do that? Awesome.” You can find #1 here and #2 here. (#2 just won an award that got the whole office really stoked.) While, I usually don’t talk about my day-job, this third project gives me the unique opportunity to share it with you because… I’m blogging on this crazy, cool new blog on DIYNetwork.com, and you’re seriously going to love it!

DIY Made + Remade

The cool thing about working for Scripps is that it’s a really encouraging environment for creatives. We all really like to make things. We’re curious about how things work. We find beauty in the process, we love collaborating, and we really like trading secrets. That’s what Made+Remade is all about. There are several bloggers from inside the office and several others from all over the country, but the underlying factor is that we all really love living the DIY lifestyle.

So, pardon the commercial, but if that sounds like something you’re into as well, hop on over and look around. (I’ve put a link in the right sidebar to make it easy to remember.) My first post is all about finding and caring for vintage costume jewelry, and I’ve got a couple more in the works. I’d love to know if you have any ideas for posts. Is there a question you question you want answered? Something you’d like to fix or a project you’re dying to try? Shoot me an email or comment below!

What sorts of things do you want to DIY?

The Belle Elsewhere

misteltoe-how-to

Yesterday, I got to share a little holiday How-To over on Inspire Me Grey. Click on over to see how easy it is to make this little mistletoe of your own… perfect for hanging, for wrapping gifts, or as a hostess gift!

Our Christmas Gallery Wall

picture collage display close-up

Confession: We bought our 1st house 6 years ago and, until recently, had virtually nothing hanging on the walls. I don’t know why. I love interior design, but when it comes to our own home, it’s been so much harder to get things done. I think it’s the perfectionist in me that is nervous things won’t turn out perfectly. But recently I made a goal to stop putting things off. So this weekend, I bit the bullet and put up the frames that had been sitting on my desk for over a year. I still haven’t decided just what photos to put in them (we hardly ever print any out) so in the meantime, I’ve made this Christmas gallery wall. It turned out to be a lot easier than I’d expected.

framing

Step 1: I cut a piece of butcher paper to the size of the space where I wanted to hang the pictures.

Step 2: I laid out all the frames out in a random way and moved them around until they were just right. Then, I used a ruler to make sure things lined up correctly.

*Tip: Get 2 different sizes of frames to mix it up a bit. I had 6 5×7 frames and 8 4×6 frames. 

Step 3: I traced the frames onto the butcher paper and then made a dot 1/4 inch into the box where the nail would need to be.

Step 4: Hang the butcher paper in place with masking or painter’s tape. Then, place the nails where you put the dots. After that, you can just gently remove the paper and leave the nails behind.

scraps collage frame

Step 5: I gathered a bunch of Christmas-y images from magazines, cards, wrapping paper, and old books. Then, I cut them to size using the glass of the frame and the XActo. I used a single image for some and for a few I made collages.

Step 6: Finally, I put the frames back together with the artwork inside and hung them on the wall.

picture collage display

What do you think? Do you ever hang seasonal artwork in your home?

Presenting: The 1st Ever How-To from Bestie Matt

This morning I am super excited to introduce you to my best friend, Matt. Not only did he decorate a cubicle junior year like a boss and sing all the words to every Disney movie made between 1987 & 1995 with me while we were in college, he also happens to be one of the craftiest people you will ever meet in real life. So, needless to say, I was super excited when he called to tell me about this How-To he’d put together for us. It is a super cute project that can translate any time of year. So without further ado, meet Bestie Matt…

Fewer things go together like southern belles and mason jars. But southern belles and mason jars *covered in glitter* would be a match made in the Heaven all southern belle’s hair strives to reach. When I was brainstorming for an idea, I thought, “What is more southern than a mason jar?” The next question was, “How do I ensure my front door doesn’t look like a recycling bin?” Welcome glitter to the situation.

What You’ll Need:
Jar Lids

Glitter
Glue
Drill or Metal Punch
Office Brad
Hot Glue Gun
Ribbon

The first step was to lay out how I wanted the wreath to look. This should be a close approximation. I ended up using a few less lids than I originally thought as I began connecting the lids together.

Next, select the colors of glitter that you want to use. I chose colors of fall. I glittered a few of each color.

Next, I laid out the colors in a pattern that I liked. Once you lay them out, mark each one with a black dot where the connection point between the lids will be.

Either using a drill or a metal punch, make a hole in the lid where the connection will be made. After the hole is created, place the insert back into the rim of the lid. I used a dab of hot glue to hold it together.

Using an office brad, connect the two together. To ensure a tight connection, put some hot glue on the open end of the brad. The more connections you make, the more sturdy the wreath will be.

The last touch is to add a bow to the front and you have a festive and southern touch to your decor!