Blueberry Lemon Scones Recipe

blueberry-scones-hannahandhusband

To be honest, while I usually like to share the origins of the recipes I blog, this recipe for Blueberry Lemon Scones has been scrawled  in my book for years. I don’t really know where it came from, but I do know that it gives me the perfect excuse to share the tricks I have for the perfect scones!

You’ll Need It:

3 1/4 C all-purpose flour
2/3 C sugar
1 Tblsp baking powder
1 tsp baking soda
3/4 tsp salt

6 Tblsp cold, unsalted butter (cut into cubes)

1 Tblsp lemon juice + enough milk to equal 1 cup

1 cup fresh blueberries
1 tsp grated lemon zest
1 egg + 1 egg white lightly beaten

Make It:

Combine flour, sugar, baking powder, baking soda, & salt.

Cut in cold, cubed butter with a fork or pastry knife until the mixture is the size of tiny peas.

Stir in lemon-milk mixture with berries and grated zest.

Add egg until just combined.

At this point, the mixture should still be wet but be able to hold together. If it’s too wet to stabilize, add just a dusting of flour.

blueberry-scones-hannahandhusband-3

Tips for the Perfect Scones:

  • Lay out parchment paper on a cookie sheet or cutting board.
  • Make the dough into a long log shape. Pull and flatten until the log of dough is 3 inches deep and 3/4 of an inch tall.
  • Score the the log of dough with a knife–first into equal squares and then half each square diagonally. Do not try to separate at this stage!
  • Like this: |/|/|/|/|/|
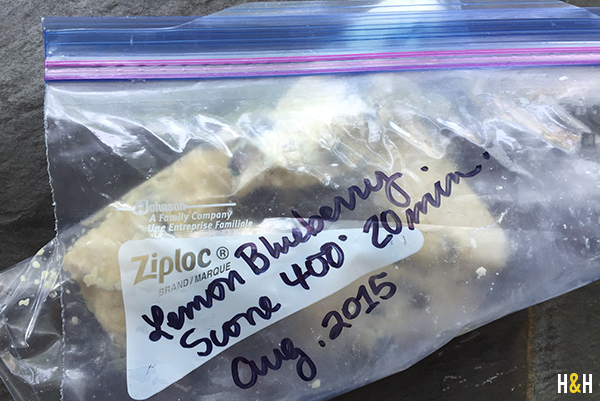
  • Throw the board of dough in the freezer for an hour.
  • When you take the dough out, you should just be able to snap the triangles apart and throw them in a Ziploc freezer bag. Label the bag and date it.
  • The next time you have company, just pull out a few scones and pop them on a baking sheet with parchment paper. Frozen dough results in moister scones.
  • Bake at 400° for 20 minutes until the tops are golden brown. (Note: Raw, unfrozen dough will cook quicker.)

blueberry-scones-hannahandhusband-2


Nannie’s Chocolate Pie

Nannie's Chocolate Pie Recipe | Hannah & Husband

Happy Pi Day! Fun Fact: Did you know that today is the most accurate of all Pi Days? To be more specific today 3-14-15 at 9:26:53 was the most accurate. (Sometimes hanging out with Husband is really handy.) Anyway, I’ve been looking for an excuse to share Nannie’s Chocolate Pie recipe with you and what better day?

Nannie was raised in north Georgia and was the quintessential Southern cook. My earliest memories are in her kitchen learning to dredge chicken and crack an egg with one hand. She was the master of Sunday luncheon and one of her specialties was this chocolate pie. It’s chocolate mousse with a meringue topping so be sure that you have enough time to let it set.

Nannie's Chocolate Pie Recipe | Hannah & Husband

You’ll Need:

Baked pie shell (If you have a deep dish, you’ll only need one, but I used 2 shallow shells.)

34 cup sugar
13 cup cocoa
2 cups milk
1 tsp. vanilla
3 Tblsp. cornstarch
3 egg yolks
1 Tblsp. butter

Make It:

In a heavy-bottomed pot, mix sugar, cocoa, and cornstarch.

Add egg yolks and milk.

Place over medium heat and stir with a whisk until thickened. For me, it took about ten minutes.

Remove from heat, and stir in butter and vanilla.

Pour into baked pie shells.

Let cool for about 15 minutes while you make the meringue.

Nannie's Chocolate Pie Recipe | Hannah & Husband Nannie's Chocolate Pie Recipe | Hannah & Husband

Nannie's Chocolate Pie Recipe | Hannah & Husband

For the Meringue:

3 egg whites
6 Tblsp. sugar
light pinch salt
light pinch cream of tartar

Make It:

Beat egg whites on high.

Add light pinch of salt, light pinch of cream of tartar.

Continue beating, adding sugar 2 Tblsp. at a time.

“When egg white will stand in peaks, pile on pie.” I recommend using small spoonfuls, which I did not know to do. When I spread my big glops out, they lost a little oomph (technical terms obvi).

Cool on the counter for about 20 minutes. Then, let pie set in fridge for at least two hours.

*It’s Worth Noting…

It’s worth noting that I hardly ever make the meringue. In our house we favor whipped cream. Choose the fluffy white topping you prefer–either is delicious!

Homemade Strawberry Jam

Huzzah! Strawberry season is here! Every year, I look forward to The Market in Maryville getting the first shipments of strawberries in from South Carolina, and last week it finally happened. Over the past 5 days, I have eaten more strawberry shortcake than most Americans will eat all year long. No regrets. So today, I thought I’d share with you one of my very favorite recipes: strawberry jam.

strawberry jam

Strawberry Jam

Ingredients:

2 lbs strawberries (it’s usually 2 containers)
1/4 cup sugar
3/4 of a peeled green apple (a natural pectin… i.e. the stuff that helps it turn to jelly)
1 tsp orange rind
1/4 tsp ground cinnamon

Instructions:

  1. Top & hull the strawberries.
  2. Use a food processor to chop berries into smaller pieces or just squish them up with your hands.
  3. Throw the green apple into the food processor as well or finely chop.
  4. Stir in sugar, orange rind, & cinnamon.
  5. In a heavy-bottomed saucepan, bring the entire mixture to a boil.
  6. Turn down and simmer for 30 minutes to an hour, stirring every 5-10 minutes.*
  7. Once your jam reaches the consistency you desire, place in jars and let cool completely. Once it’s completely cool, store it in the fridge.

*For the first 20 minutes or so, you’ll need to remove the foam that accumulates on the top. The foam is really just a result of the boiling jam. It won’t really affect the taste, but it will prevent your jam from reaching the right consistency.


The best thing about strawberry jam is that it will make your house smell like the perfect Spring evening. It’s equally as yummy on toast as it is on shortbread, and while I’d suggest canning it, I can almost guarantee your batch won’t last that long. So turn on some Nat King Cole, curl up on the couch with your honey, and enjoy the natural aphrodisiac of Strawberry Jam. You can thank me later.

Is making jam just not enough for you? Consider heading to Dayton, Tennessee this weekend for the annual Strawberry Festival. Just looking for a new dessert? Might I recommend Alton Brown’s shortcake recipe? It is delish!

Momma’s Fantasy Fudge

Thanks to Pinterest, I have been finding so many great recipes lately, and this afternoon I plan on sharing a few of my favorites on Twitter & Facebook. But first, I thought I’d share one of our favorite family recipes. This time of year, we keep the ingredients on hand for easy access on a rainy Friday night or a snowed-in school day. I prefer peanut butter fudge as you can tell from the pic below, but the recipe can be for both chocolate and peanut butter fudge… it all depends on what chips you use!

fantasy-fudge-secretsofabelle

Momma’s Easy Fantasy Fudge

Prepare a 13×9 or 9 inch square pan by lightly greasing it before starting your recipe. You will need a 4 quart microwavable bowl for this recipe.

Ingredients:

1 1/2 sticks butter

3 cups granulated sugar

2/3 cup evaporated milk

1 package (12 oz) semi-sweet chocolate chips (or peanut butter chips, plus 1/2 cup creamy peanut butter)

1 jar (7 oz) marshmallow creme

1 cup chopped nuts (optional)

1 teaspoon vanilla

– – – – – – – – – – – – –

1.) Microwave butter one minute or until melted.

2.) Add sugar and evaporated milk; mix well.

3.) Microwave on HIGH for 5 minutes, stirring after 3 minutes. Mix well; scrape bowl. Then microwave on HIGH for another 5 minutes, stirring after 3 minutes. It’ll be boiling like crazy.

4.) Gradually stir in chips until melted. Add remaining ingredients, in order listed; mix well.
Pour into prepared pan. Cool at room temperature before cutting into squares. Store in an airtight container. Makes 3 pounds.

Tips & Tricks from Momma:

If you are making this recipe with peanut butter, the reason for the 1/2 cup peanut butter addition is that the peanut butter chips come in a smaller weight than the chocolate. 

One word of warning: I’ve always made several batches of fudge in a row. I learned the hard way that your spoon needs to be completely dry when you add and stir in the chips and marshmallow creme. I used to stir with my favorite wooden spoon and would wash it in between batches of fudge. The wooden spoon tended to not be completely dry when I’d work with it on the second batch. What happened is that the fudge would suddenly turn grainy and harden much too fast to work with. I learned my lesson…and in the process, realized that an introduction of another liquid such as vanilla flavoring should always be added right at the end of the recipe!

P.S. Don’t forget to check Twitter & Facebook this afternoon to see some of my favorite Pinterest recipes! #BellesPinterestFinds


Halloween Candy: Little Ghosts

Looking for another alternative to those expensive bags of store-bought candy? This one is simple and yummy! I first saw these little guys on pinterest, and I just had to try them. I used the large pretzel sticks, one and a quarter cup white chocolate chips and 2 teaspoons shortening. I slowly (slow is key) melted the chocolate, adding the shortening a little bit at a time. (The shortening is what thins the chocolate enough to dip the pretzels smoothly.) After letting the chocolate cool and set, it’s time to add the faces. I used black icing but on pinterest I saw that you could use mini chocolate chips if you’d like.

I also found it super fun to package these little guys. For a party, I used a little mason jar, fruit netting and twine. Then, for a couple of friends, craft paper and orange yarn.

– – – – – – – – – – – –

Although, I should probably warn you there is one serious side effect of this craft. I will be singing this song all weekend…

I miss the White Stripes. [ sadface ]

Halloween Candy: Cookies

Who said you don’t get presents at Halloween? Here you go, my gift to you…

These cookies are going to make you friends.

There, I said it.

I hate to go all Dale Carnegie on you first thing on a Saturday morning, but if you really want to ‘win friends and influence people,’ you’d better learn to bake. And if you can bake cookies like these, you may never be lonely again.

…Unless, of course, you choose to bake them and then eat them alone watching Addams Family reruns, which I happen to think would be quite festive of you. Que sera…

The recipe can be found on Joy Cho’s blog by clicking here. 

Now here’s what I do…

I bake the cookies following the recipe on Joy’s blog and then separate them into 2 groups.

On one group goes melted white chocolate.

On the other group goes a mixture of peanut butter with just a little powdered sugar to give it more body.

Finally, I put a marshmallow on the ones with white chocolate and stick them in a warm oven to soften up.

Squish the little sandwiches together and there you have it! I believe Joy said she’d also tried salted caramel with it, which I have not. However, I can assure you, no matter how you make them, they’re sure to be a hit!